SUV Lights.com
FAQ -
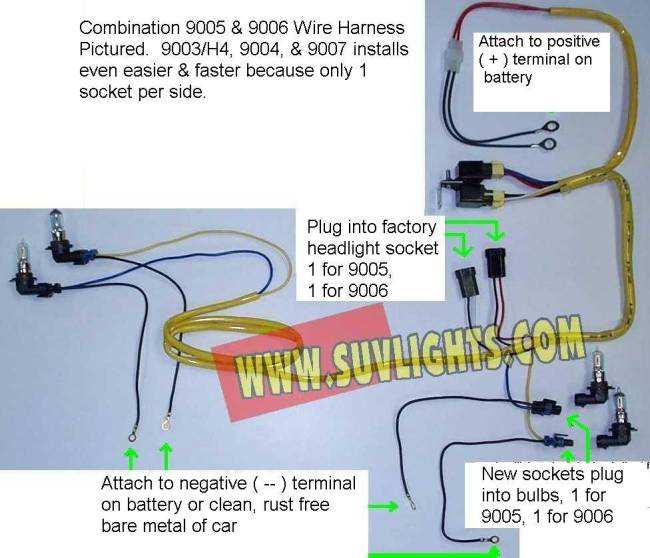
General Installation Instructions for Heavy Duty
Headlight Wiring Harness
General Installation Instructions for Heavy Duty
Headlight Wiring Harness
-
Unravel wire harness and lay out in your engine
bay (Caution! engine may be hot!) to make sure there is sufficient length.
-
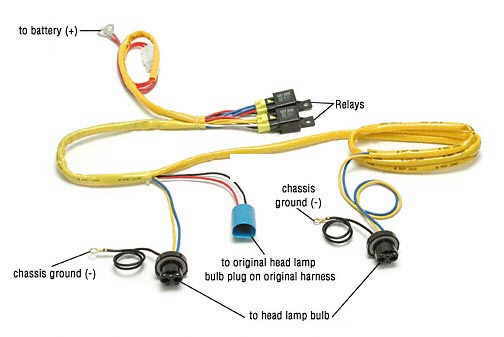
connect the 2 power wires (fusible links can be
black, red or green to red wires on relay socket*) to the positive (+)
terminal on the battery. Tip: you can temporarily disconnect the fusible links
to the rest of the wire harness for easier install.
-
Unplug the factory headlight socket(s) on the side
closest to the battery,
(i.e. if your battery is located closer to the driver side unplug the
headlight socket on that side.) and plug into the mating socket (socket that
resembles the back of a headlight bulb).
-
Plug the new wire harness headlight socket into
the bulb and attach the ground wire to a major metal section of your vehicle
(you may ground to the battery negative – terminal if possible). Be sure that
your ground is to something that is rust and paint/undercoating free, it must
also use a screw that conducts well. (note: most of the problems occurs with
improper grounding.)
-
Do the same with the other side.
-
Plug in both relays (one is for low beam, the
other for high beams) and apply electrical contact grease (or similar) to
prevent corrosion.
-
Turn on your headlights.
*note: fusible links function as a slow
reacting fuse and provide more power
NOTE: for vehicles with dual
batteries (such as the Ford Super Duty) it is recommended that 2 wire
harnesses be used connected to each battery.